A well-made and informative video can be one of the most valuable promotional tools for a department of urology. Having to resort to an external commercial source to produce a video can be prohibitively expensive. With the extensive computing power presently available to us, it is well within the capability of any department to produce its own video. In this second and last paper in our series (Part 1 available here), we describe how to edit and produce a fully narrated surgical video.
In our first paper in this series we described some technical considerations for recording surgical video [1]. In this second article we describe how to take raw video footage and media from various sources, edit and subsequently narrate it to produce a finished product suitable for teaching or publication.
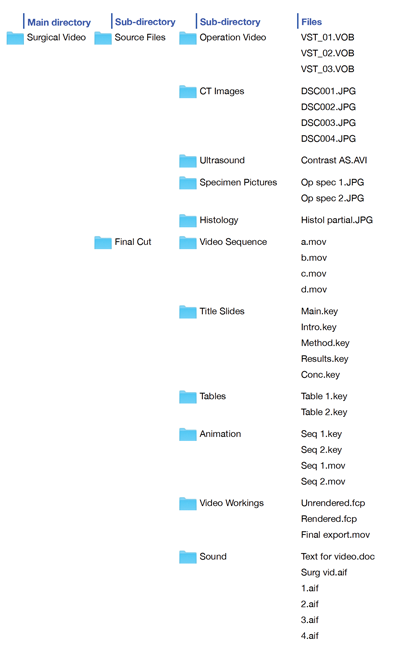
Figure 1: Organisation of source material (operation video, CT images, ultrasound images, specimen pictures and histology images), which may have been collected over many months, and video workings into files within clearly labelled directories and sub-directories.
Practical considerations
When creating a video, it is important to be well organised and methodical in your preparation as there will often be several repetitive steps in the process. Also, material for a video may have been collected over many months, so from the outset, try to keep all the digital material together in clearly labelled folders, subdirectories and files (Figure 1). Material for a video may include operative or surgical footage, still images of a surgical specimen or x-ray images. If the video is demonstrating a certain surgical approach, draping of patient or surgical incision, plan to get still images the next time such a case comes to theatre. If the video is demonstrating theatre layout or set up of a nurse’s trolley it might be more practical to get these images when theatre is empty or at the weekend when you are less likely to interfere with normal workings of theatre. At the outset, create a plan for the video (Figure 2) and know approximately how long the finished product needs to be.
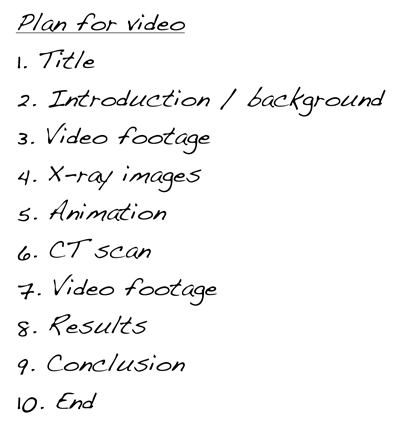
Figure 2: Outline plan for video.
“Be methodical and well organised when creating a surgical video.”
This gives you a target to work to and a finite length for the video timeline (see below). When planning the video, be clear about what you want to demonstrate and how this might best be achieved. In practice, we start by putting in the title scene and the end scene. The timeline in between is then populated with video sequences which have to ‘fit’ between these limits.
Hardware
In our previous article, we recommended that surgeons contemplating production of surgical videos should consider using a Mac rather than a Windows based PC. It is well recognised in the industry that a Mac is better suited to graphics and video editing. In our own practice we use an iMac and a MacBook Pro (Apple, Cupertino, California), which are networked to allow easy exchange of files (Figure 3).
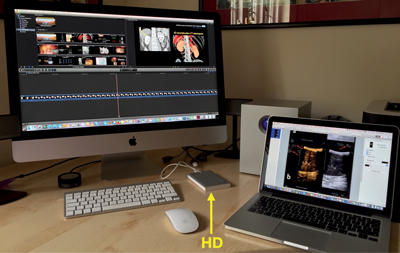
Figure 3: Networked iMac and MacBook Pro increase computer desktop space and computing power available to use simultaneously and work on components of video. A separate detachable hard drive (HD) is used to store the material and workings for the surgical video.
Quite often when editing video it is necessary to create a table, annotate an image or create an animation to fit into a video at a particular time point. In these situations, it is very useful to have extra computer desktop space to avoid having to close down one window while working on another. Although, since a second computer may be considered to be a luxury, an alternative would be to have a second monitor, which also increases the size of the computer ‘desktop’. We would also recommend that any video files or workings on files should be saved on a separate dedicated external hard disk drive, possibly even in duplicate. Storing raw material for a surgical video on an external hard drive has several advantages; firstly, it conserves the computer’s own hard disk space which is usually the boot-up drive and this will have a direct effect on the speed of the computer; secondly, storing video files on a separate dedicated hard disk allows the hard disk with potentially graphic surgical images to be disconnected from the iMac which may be the family computer; and thirdly, it allows the portable drive with the precious surgical video, to be safely stored away and not inadvertently deleted.
Software
There are two main levels of video editing software for the Mac, both downloadable from the App store (Apple, Cupertino, Califonia). We regard iMovie as the simplest or entry level software, although in our practice, we have used both Final Cut Express and Final Cut Pro. Final Cut is the professional level software, which is even used in Hollywood productions. The advantage of becoming familiar with Final Cut is that it is industry standard and will handle a variety of video input and output formats, even 3D video. Final Cut has various components to organise and display the constituents of a video, which are built spatially in the video frame or ‘canvas’ (Figure 4).
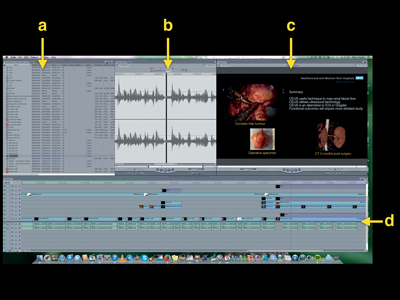
Figure 4: Different components of Final Cut Express video editing software –
a) bowser window
b) viewer window
c) canvas window
d) video timeline
Initially, files containing material to be used in the video are placed into the ‘browser’ window. Appropriate segments of material to incorporate into the video are then identified by inspecting the material from files in the browser, in the ‘viewer’ window. As sequences of videos, still images and text are laid onto the canvas, the temporal orientation and relation of these different components of the video may be seen graphically on the timeline. As will be noted on the timeline, visual media such as pictures, text and video sequences appear on the upper aspect of the timeline in different video channels and auditory media appear in the lower half of the timeline, again in separate auditory channels. The duration of these components may be adjusted as required. In addition, special effects on how the visual components appear, disappear or blend with the next sequence can be added. Similarly, the auditory components (voice or music) may also be adjusted to create the desired effect. Further video or auditory sequences may be added as required and appropriate transitions placed between them. When the final or near-final video sequence with animations, images and auditory clips has been placed in order, the sequences are ‘rendered’ into a playable video clip.
Making the video
Most operative teaching videos will demonstrate some surgical anatomy or new technique within an operative procedure. This is best achieved with step-by-step animation or even graphical overlay on video footage. Most surgeons are used to making slide presentations with imbedded graphics and tables. An animation or graphical overlay may be built up frame-by-frame in Keynote (the Mac equivalent of PowerPoint). Working with Keynote, each slide is in effect, a ‘frame’ of the video and using the ‘Dissolve’ transition function to switch between frames, several frames may be linked together into a short video sequence, which can then be exported from Keynote as a Quicktime file. This Quicktime file can then be dragged and ‘dropped’ into Final Cut to incorporate into the video. Alternatively, individual slides can be exported from Keynote as images (.tif or .jpg) and a video sequence built up in Final Cut, again using a suitable transition between frames.
The advantage of using a program such as Keynote to create animations or to annotate images with text, is that Keynote contains a variety of different drawing tools, familiar to doctors who regularly make presentations.
Incorporating radiological images into a video
When making a surgical video for publication surgeons may need to incorporate some radiological imaging. It is, therefore, important to be familiar with how to import and manipulate radiological images within a video. Radiological images may come from a variety of sources – ultrasound, CT, MRI or nuclear medicine. Ultrasound pictures are usually captured as 2D still images, although there may be access to dynamic images which have been recorded as a short video sequence e.g. a colour flow Doppler or contrast enhanced ultrasound. In these cases it is important to know the video format in which the ultrasound scanner has saved the recording (.avi, .flv, .wmv, .mov, etc). Although the file generated by the ultrasound scanner might not be immediately useable by Final Cut, we have found that VLC software [2], which is freely available, can open most video files and subsequently convert into a suitable format (.mov, .mp4, etc) to be read and handled by Final Cut.
Cross-sectional imaging (CT or MRI) often generates several tens of images, depending on the thickness of the axial slice used by the scanner. If you are selecting just a few images these can be anonymised and downloaded to a USB stick or emailed). Otherwise we have found it easiest to get the hospital radiology department to burn a DVD of all the relevant imaging as hospital standard DICOM files. Sometimes, a helpful technician in the radiology department will anonymise these DICOM images when burning them to the DVD. The images can later be anonymised in OsiriX [3]. OsiriX is, in our experience, the most versatile software for viewing cross-sectional imaging and is excellent for preparing video sequences from a series of CT or MRI images. OsiriX Lite (32 bit version) is freeware and will open any DICOM files and allow you to export anonymised sequences of images in MPEG-4 or QuickTime format. It allows you to manipulate 2D and 3D images prior to selecting a specific frame rate and exporting a video file or still images.
In certain circumstances, you may wish to annotate or even add coloured shading to cross-sectional images to illustrate anatomy and subsequently incorporate them into a video sequence. Using Keynote (as above), we create a ‘custom’ sized slide to match the size of the radiological image, which is shown on the file attributes e.g. 512 x 512. We then ‘drag and drop’ the relevant cross-sectional images into Keynote which then automatically creates individual slides from each image. The relevant slides are now annotated with text or the relevant anatomical detail may be outlined with a Keynote drawing tool. At this point, it is important to note that any shape made with a drawing tool may be filled with colour and this colour shading may be either as a solid block of colour or made to have various degrees of transparency to allow anatomical detail to be seen through the shading. This technique is particularly useful when demonstrating surgical anatomy. In order to make annotations more obvious, it is sometimes worthwhile duplicating plain image slides just before and after the annotation starts or changes and this makes the annotation stand out (Figure 5).
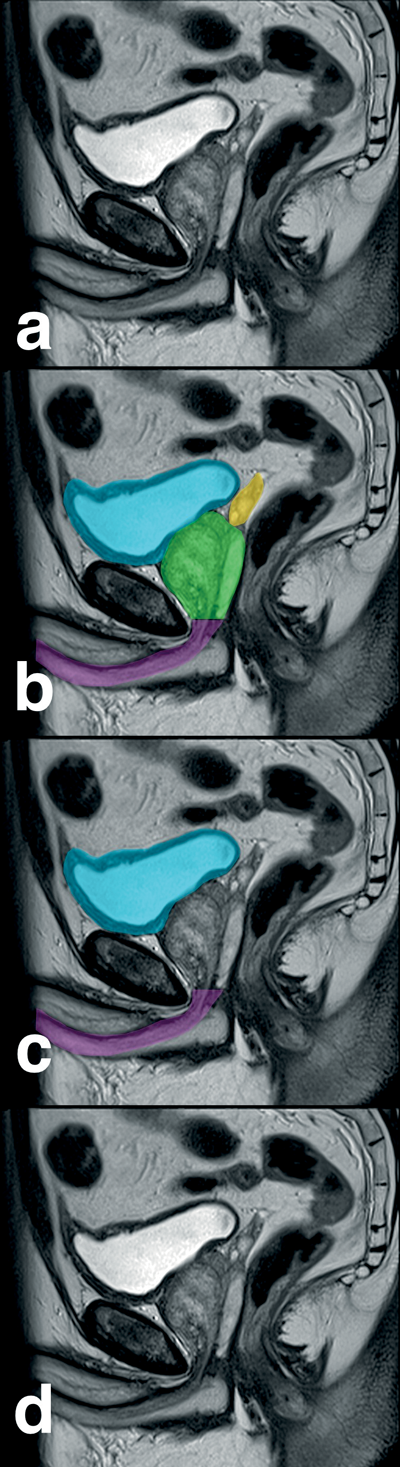
Figure 5: Anatomical annotation of radiological images as Keynote slides (a – d)
with transparent colour shading. Sequential slides are exported as a QuickTime movie.
When annotations are completed, we choose a ‘dissolve’ transition between the slides and then export the slides as a QuickTime movie. This video sequence is now imported into the browser window of Final Cut.
Converting media
When you start producing surgical videos, you will occasionally come across a file format that will not import directly into Final Cut. In this situation, the quickest solution is to ‘Google’ the problem e.g. “How do I convert file .abc to .xyz?” You can be pretty sure that there will be a solution on the Internet as you are unlikely to be the first person to have encountered this problem. As mentioned above, if you are dealing with a video file, VLC is probably the more useful software as it will open almost any video file on a Mac.
Video content
It is sensible to gather together all the content for a surgical video before starting to create the video. As mentioned above, it is important to be methodical from the outset. On a removable hard disk, we recommend creating a main directory for all the files, which are going to be used in creating the surgical video. Based on the plan for the video (Figure 2) the original raw videos (unedited surgical footage) and sections taken from it should be clearly labelled and placed into separate folders for workings such as title, section headings, still images, tables and animations (Figure 1). When putting the video together, it may be necessary to create several repetitive frames, which have the same background and only differ slightly with respect to the wording e.g. Introduction, Material and Methods, Results or Conclusions. It is therefore sensible to keep the source Keynote file in the same directory so that you can easily refer back to it, to change one or two characters and create a new frame for the video.
Editing the surgical video
In our experience, this is best achieved if the video is edited by the most experienced surgeon, who has either performed the operative procedure, or has knowledge of the particular surgical technique that you are trying to demonstrate. The surgeon will usually know which sequence of video best illustrates what they are trying to show and thus, it makes sense that they spend the time reviewing the operative video and selecting the appropriate video sequences. This will save a lot of time as it is relatively simple procedure to view a video sequence in Final Cut, place ‘in’ and ‘out’ tabs to copy and paste a video sequence onto the timeline. Once the operative sequences have been chosen, the educational content of the video can be embellished by highlighting anatomical detail, creating and inserting animations, adding text, tables, title page and an end sequence with credits.
In our experience, the quickest way to get familiar with Final Cut is to look at YouTube tutorials [4], which are free. Alternatively, depending on your budget, you may consider some professional online video tutorials [5]. YouTube has, however, been our first port of call to find solutions to procedures in Final Cut.
Adding Sound
Once the visual sequence of a video has been finalised, it might be appropriate to narrate the video or add some quiet, non-fractious background music. Adding music however, may not always be necessary. It is important to realise that your taste in music may not be the same as others and it may actually distract or irritate viewers of your video. If you wish to add music, it is best to download royalty-free music or create your own short, vocal free music loop in Garage Band (Apple, Cupertino, Califonia).
Prior to recording the voice-over for the video, we recommend you view the finished video sequence, stopping and starting where appropriate.
During this process, make notes and decide on the appropriate narrative to insert. We try and keep the narrative clear and succinct. The text for this narration should be typed directly in short sentences into a Word document with one or two sentences for each paragraph. The advantage of keeping sentences short is that they can be easily moved to fit in earlier or later in a video sequence (see section below on merging sound with video). The type should be well spaced out and easy to read. The text is kept in the same temporal sequence that it will appear in the finished video, which will subsequently make recording and inserting the sound clips easier.
Recording software
There are several software programs available for recording voice, suitable for insertion into a video. We would, however, recommend Garage Band (Apple, Cupertino, Califonia). With Garage Band open, the appropriate input mic is identified and a voice audio file is created. While recording, each piece of text is read out with two or three second gaps, starting and stopping the recording between each sentence (Figure 6). The aim is to create one long audio file, which can then be exported in ‘CD’ quality and dragged into Final Cut. In Final Cut, the file is opened in the browser window and the sound waveform can easily be seen while simultaneously playing back the recording. Using this visual tool, an audio clip can be cut, copied, trimmed and then inserted into the correct position on the video timeline.
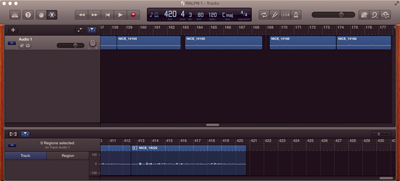
Figure 6: Screen shot from Garage Band showing voice-over
recorded as several sentences in one long file sequentially.
With experience, we have found that it is best to record a video voice-over all in one sitting, on one long audio file. This keeps the record settings the same for the entire video. Similarly, avoid using different input sources to record a voice-over. Recording quality can vary considerably from different input sources.

Recording devices
Several devices may be used to record audio for a video. These devices range from a dedicated high quality USB microphone to a mobile phone headset or even a mobile phone. We have tabulated examples of different recording devices and their properties (Table 1). In our practice, we have opted to use the Blue Microphones’ Yeti USB microphone (Westlake Village, Califonia) [6], which gives a consistent high quality recording. Practise recording with different devices and settings and use the hardware with which you are most comfortable.
Recording environment
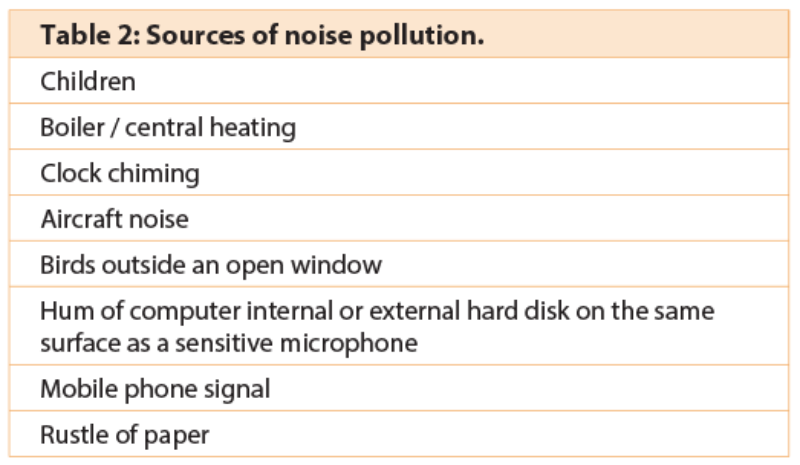
Sound is very unforgiving. What you record is what you hear. It is, therefore, best to be very precise and only record what you wish to be heard on the video. Every blemish or interfering background noise will detract from the quality of the finished video. It is good practice to record sound in a very quiet environment and check for sources of noise interference. This can be done by setting up the recording system exactly as you plan to use it and recording two or three minutes from the microphone without any voice input. This ‘blank’ recording may then be played back at a higher volume and checked for unwanted sources of noise interference, sources of which can be quite surprising (Table 2). Obviously, the best place to record sound would be in a sound studio. As we do not have access to this sort of facility, we have been using the next best thing, which is an obsolete, audiology soundproof booth, in our private clinic. We place our MacBook Pro computer and USB microphone into the booth to record in silence. When reading and recording the printed text, we even do not hold paper as, this itself, may create unwanted noise interference. A useful alternative for those without access to a soundproof booth is to create your own home mini recording studio using sofa cushions (Figure 7). This is a simple solution as the cushions can absorb a lot of background noise and improve the quality of a recording.
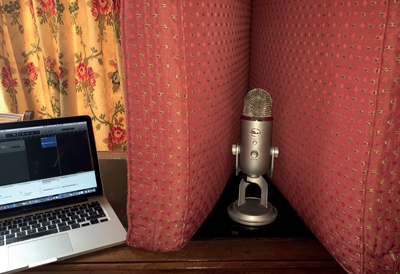
Figure 7: Home-made sound recording studio. Sofa cushions surround the
Yeti microphone (Blue Microphones) to dampen noise interference.
Merging sound with video
As mentioned above, it is important to be methodical and well organised when creating a surgical video. By the time you are ready to add audio to the video, you should have created a series of directories, sub-directories and individual files, which are all part of the editable final video sequence (Figure 1). At this point, before attempting to add sound, you should save the final editable video sequence. This is important advice since, if you ever need to adjust the video length or content in future, you do not have to start again from scratch. The final editable video sequence is now ‘rendered’. Rendering the video joins together all the individual clips, animations and images, which have been assembled to create the video. Sound can now be added to this soundless playable video.
When placing sound clips on the video timeline, it is important to remember that sound travels more slowly than light. The human brain also processes an auditory stimulus more slowly compared to a moving image. In order to get a viewer’s attention, it is helpful to start a sound clip a few seconds before the visual image to which it relates. This gets the viewer to focus on the relevant video image, which is about to appear or to look out for the surgical step being described.
Overlying text
If a surgical video is good, a company may ask your permission to use it on one of their trade stands at a conference, for example BAUS or the AUA. In this situation, the video may be played in a noisy environment with lots of other trade booths. It is therefore useful to have text inserted as an overlay in the video to describe the step being shown (Figure 8).
Other considerations
With digital media, plagiarism can be a problem. It is easy to download a video from the Internet and either use it in presentations or on a different website. It can be a source of irritation to see one’s work presented without acknowledgement. With scientific data, accepted protocols are to reference the source on slides being presented or in published papers. With video footage, however, it is easy for it to be incorporated into a presentation without necessarily recognising the source. A simple solution for this is to always identify your institution on the video for publication either as a partially transparent logo or a faint unobtrusive moving watermark (Figure 8). This will ensure recognition for your institution and help promote your work.
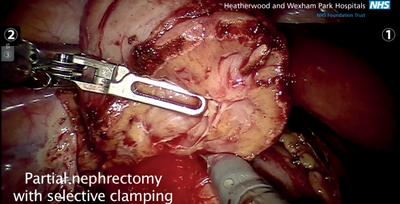
Figure 8: Frame from video to show i) explanatory text, and ii) institution logo.
Additional images
The majority of the images used in a video for a surgical audience may be obtained by you, your team or the pathology department. On occasions, it may be preferable to show less graphic representations of a surgical specimen or procedure or other objects for example in making information videos for patients (Figure 9). These additional images can either be created in-house or professional quality images may be purchased and downloaded from commercial photo library websites [7,8,9].
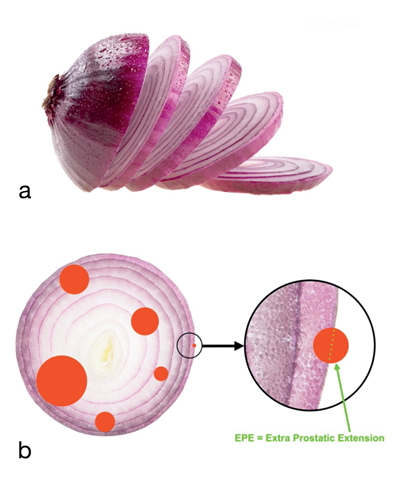
Figure 9: Examples of commercially available images used in patient information videos to demonstrate a) preparation of the prostate by the pathologist; and b) multifocal nature of prostate cancer and an explanation of pathological staging in lay terms.
Conclusion
In this day and age, creating a high quality anonymised surgical video for teaching or publication is well within the capabilities of most surgeons. Creating a video can be very rewarding and stimulating, in addition to promoting surgical education. We already have, after all, the majority of the hardware and software technology in the computer on our desk.
References
1. Nana G, Colvin C, Karim O. Surgical video – part 1: Intraoperative video recording and storage. Urology News 2015;19(3):6-10.
2. www.videolan.org/vlc/index.en_GB.html
3. www.osirix-viewer.com
4. www.youtube.com
5. www.larryjordan.biz/app_bin/Store/catalog/
6. www.bluemic.com/yeti/
7. www.shutterstock.com/
8. www.gettyimages.co.uk
9. www.istockphoto.com/stock-photos
Declaration of competing interests: Mr Omer Karim is a proctor in robotic assisted surgery and has received fees from Intuitive Surgical for teaching robotic surgery.